Learning 14-channel IR remote control
receiver
description
Control anything with your existing
remote
control. This receiver works with either RC-5 or NEC format IR remote
controls, depending on the firmware version.
The
receiver has 14 output channels, and each channel can have up to 4
buttons (on, off, toggle, momentary-on operation mode) associated with
it.
Each button can operate the output in
four different operation modes:
- off: turn the associated output channel off
- on: turn the associated output channel on
- toggle: turn the associated channel output on then off
- momentary-on: turn the associated channel on for the time the
button is being pressed
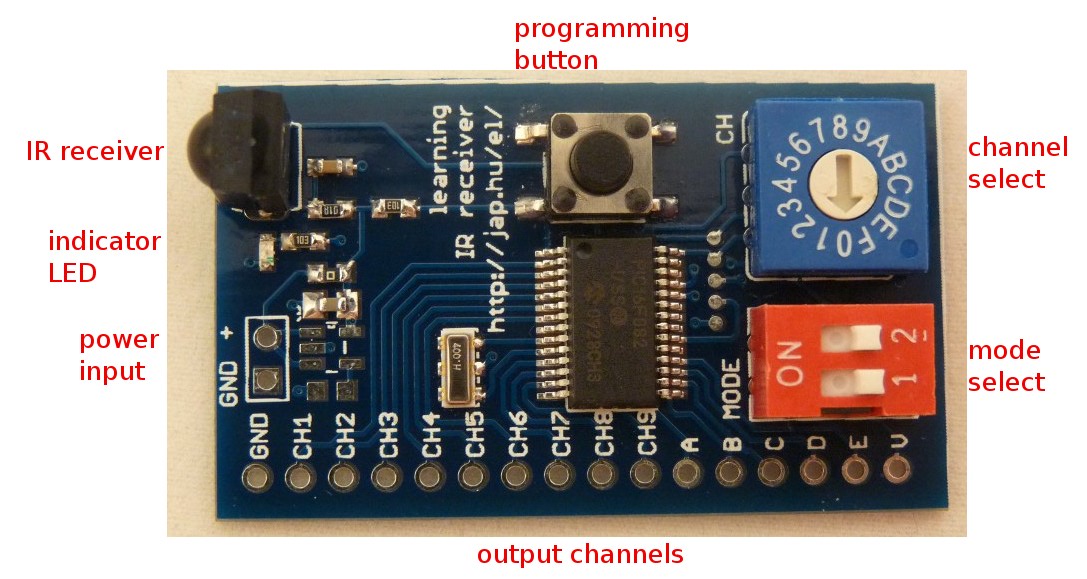
The board has the following connectors:
- 2-pin connector for power input
- 16-pin connector with TTL outputs for each channel, GND and VALID
output
| Board size |
44x26mm (1.73x1 inch) |
| Supply voltage |
2.5-5.5VDC |
| Maximum current per channel |
+/- 20mA |
| Maximum current for all channels |
+/- 90mA |
For more information on the remote control formats, please check these links:
teaching buttons
To erase all button associations, set the channel selector to position
"F" and hold the programming button pressed while turning on the circuit.
To enter programming mode, set the channel selector to any position
other than "F" and hold the programming button pressed while turning on
the circuit.
After entering the programming mode,
the two mode select switches determine the operation mode of the remote
control button being learnt.
operation mode
|
1
|
2
|
the next button pressed turns
the selected output channel OFF
|
ON
|
OFF
|
the next button pressed turns
the selected output channel ON
|
OFF
|
ON
|
the next button pressed toggles
the selected output channel
|
OFF
|
OFF
|
the next button pressed turns
the selected output channel ON for the time being pressed
|
ON
|
ON
|
To erase the next remote control button
pressed from the memory, hold the programming button down while
pressing the remote control button.
Setup the two mode select switches
according to the desired operation mode, then select the associated
channel with the channel selector. Channels are numbered as 1, 2, 3, 4,
5, 6, 7, 8, 9, A, B, C, D, E. If you select position "F" or "0", you
can't teach buttons in programming mode.
After the operation mode and the channel is selected, push a button on
the remote control to teach. If the button was learnt successfully, the
indicator LED flashes for a moment. If you can't see the LED light up
for a
moment, the button pressed is already associated to something, and
can't be used again.
If you want to erase a remote control from the memory, hold the
programming button down while pressing the remote control button. Leave
the operation mode switches and channel selector as is, their state is
not significant. Then push the remote control button to
be erased. The indicator LED flashes for a moment, signaling the button
is
erased.
When you have finished programming, set the channel selector to
position "0" and turn off the circuit.
An example programming session:
- set the channel selector to position "F"
- turn off the circuit
- hold down the programming button while turning on the circuit -
all button associations are erased
- setup the operation mode select switches as: 1: ON, 2: ON -
momentary-on operation mode is selected
- select position "1" on the channel selector - channel #1 is
selected
- push button 1 on the remote control - the indicator LED is lit
for a moment, signaling successful learning
- select position "2" on the channel selector - channel #2 is
selected
- push button 1 on the remote control - nothing happens, as this
button is already associated to something, and can't be used
- push button 2 on the remote control - the indicator LED is lit
for a moment, signaling successful learning
- select position "3" on the channel selector - channel #3 is
selected
- push button 3 on the remote control - the indicator LED is lit
for a moment, signaling successful learning
- setup the operation mode select switches as 1: OFF, 2: OFF -
toggle operation mode is selected
- select position "6" on the channel selector - channel #6 is
selected
- push button 6 on the remote control - the indicator LED is lit
for a moment, signaling successful learning
- select position "7" on the channel selector - channel #7 is
selected
- push button 7 on the remote control - the indicator LED is lit
for a moment, signaling successful learning
- select position "8" on the channel selector - channel #8 is
selected
- push button 8 on the remote control - the indicator LED is lit
for a moment, signaling successful learning
- hold down the programming button while
- push button 3 on the remote control - the indicator LED is lit
for a moment, signaling successful erase
- push button 8 on the remote control - the indicator LED is lit
for a moment, signaling successful erase
- setup the operation mode switches as 1: OFF, 2: ON - turn on
output channel operation mode is selected
- select position "B" on the channel selector - channel #11
is selected
- push button VOL+ on the remote control - the indicator LED is lit
for a moment, signaling successful learning
- setup the operation mode switches as 1: ON, 2: OFF - turn off
output channel operation mode is selected
- push button VOL- on the remote control - the indicator LED is lit
for a moment, signaling successful learning
The resulting button layout is:
channel
|
toggle
|
off
|
on
|
momentary
|
1
|
|
|
|
1
|
2
|
|
|
|
2
|
3
|
|
|
|
|
4
|
|
|
|
|
5
|
|
|
|
|
6
|
6
|
|
|
|
7
|
7
|
|
|
|
8
|
|
|
|
|
9
|
|
|
|
|
A
|
|
|
|
|
B
|
|
VOL -
|
VOL +
|
|
C
|
|
|
|
|
D
|
|
|
|
|
E
|
|
|
|
|
operation: decoding
The programming button must not be held
down when powering on the circuit to enter normal decoding operation.
In this mode, any remote
control button learnt will light up the indicator LED for the duration
the
button is pressed. Output channel states will change according to the
operation mode learnt.
feedback
Please contact the author if you found an error, incomplete or missing
documentation, or you have trouble making this circuit work.